Showing posts with label Azure Cloud Computing Microsoft Azure Cloud Services Cloud Benefits IT Infrastructure Digital Transformation Business Solutions Technology Trends Software as a Service (SaaS). Show all posts

Tuesday, December 31, 2024

Understanding Azure Availability Sets: Ensuring High Availability for Your Applications


In the cloud era, where applications and services must be available 24/7, ensuring high availability is a critical requirement. Microsoft Azure, one of the leading cloud service providers, offers various tools and configurations to help businesses achieve this goal. Among these, Azure Availability Sets stand out as a fundamental feature for enhancing application resilience. This article dives into the concept of Azure Availability Sets, explaining their importance and how they work to protect your workloads from unexpected downtime.

What is an Azure Availability Set?

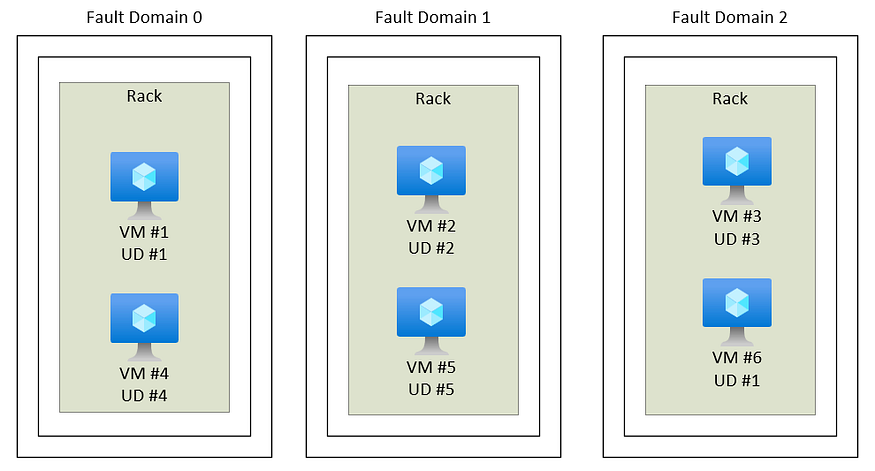
An Azure Availability Set is a logical grouping of virtual machines (VMs) that helps maintain the availability and redundancy of your application. By placing your VMs in an availability set, Azure ensures that the underlying hardware — such as servers and racks — hosting your VMs are distributed across multiple fault and update domains. This reduces the likelihood of a single point of failure impacting all your VMs simultaneously.

Key Components of an Availability Set

  1. Fault Domains: Fault domains are a group of physical hardware resources that share a common power source and network switch. When you deploy VMs in an availability set, Azure distributes them across multiple fault domains. This ensures that even if one domain experiences a hardware failure, other VMs in the set remain unaffected.
  2. Update Domains: Update domains are logical groups used to manage maintenance activities, such as software updates and patches. Azure schedules updates one update domain at a time, ensuring that at least a portion of your application remains available during the maintenance process.

Why Use Availability Sets?

  1. High Availability: By distributing your VMs across fault and update domains, Azure Availability Sets minimize the impact of hardware failures and planned maintenance activities, ensuring your application remains accessible.
  2. Cost-Effectiveness: While high availability can often require additional resources, using availability sets is a cost-effective way to achieve redundancy without duplicating your entire infrastructure.
  3. Service Level Agreement (SLA): Azure guarantees a 99.95% VM uptime when your VMs are deployed in an availability set, compared to lower SLAs for standalone VMs.

Use Cases for Availability Sets

  • Web Applications: For applications requiring consistent uptime, such as e-commerce platforms, deploying VMs in an availability set ensures minimal disruption during maintenance or hardware failures.
  • Database Servers: Critical databases often require high availability to ensure uninterrupted access to data. Placing database servers in an availability set helps achieve this goal.
  • Enterprise Applications: Complex business applications that rely on multiple VMs can benefit from availability sets by reducing the risk of downtime.

How to Create an Availability Set

Creating an availability set in Azure is straightforward:

  1. Navigate to the Azure Portal: Log in to your Azure account and go to the Azure portal.
  2. Create an Availability Set: Click on “Create a resource” and search for “Availability Set.” Provide the necessary details, such as the name, region, fault domains, and update domains.
  3. Assign VMs to the Set: When creating or reconfiguring VMs, associate them with the availability set.

Best Practices

  • Plan for Redundancy: Ensure that your application components are distributed across multiple VMs within the availability set.
  • Combine with Load Balancers: Use Azure Load Balancers to distribute traffic across the VMs in your availability set, further enhancing availability.
  • Monitor and Optimize: Regularly monitor your availability set to identify potential bottlenecks or areas for improvement.

Conclusion

Azure Availability Sets are a powerful feature for achieving high availability in the cloud. By leveraging fault and update domains, they ensure that your applications remain resilient against failures and downtime. Whether you’re hosting a simple website or a complex enterprise application, incorporating availability sets into your Azure strategy can help you deliver reliable and uninterrupted services to your users.

Start using Azure Availability Sets today and take a significant step towards building a robust, high-availability cloud infrastructure!

Connect with Me:

Thursday, December 26, 2024

Increase Virtual Machine Quota

 When working with cloud platforms such as AWS, Google Cloud, or Azure, you might encounter a situation where you’ve hit the quota limit for creating virtual machines (VMs). Quota limits are in place to prevent over-utilization of resources and to maintain infrastructure stability. But don’t worry — requesting an increase in your virtual machine quota is a straightforward process. This article will walk you through everything you need to know.

Why Do Quota Limits Exist?

Quota limits are predefined restrictions set by cloud providers to manage the allocation of resources. These limits ensure:

  • Fair resource distribution among users.
  • Prevention of abuse or accidental overuse.
  • Cost control, so users don’t accidentally incur unexpected charges.

Common quota limits related to virtual machines include:

  • Number of VMs per region.
  • CPU core limits.
  • GPU allocation.
  • Disk storage capacity.

Signs You Need a Quota Increase

Before requesting a quota increase, confirm that you’re hitting the quota limits and not encountering unrelated issues. Here are some indicators:

  • You receive an error message while provisioning a VM.
  • Resource availability in a specific region shows as “exceeded.”
  • Quota usage in your cloud dashboard is close to or at its maximum.

Steps to Increase Your Virtual Machine Quota

Step 1: Check Current Quota Usage

  • Navigate to your cloud platform’s quotas dashboard.
  • On AWS, visit Service Quotas.
  • On Azure, go to Usage + quotas in the Azure portal.
  • On Google Cloud, access IAM & Admin > Quotas.
  • Review your current quota usage and identify the limits you’re about to exceed.

Step 2: Understand Your Requirements

Identify the following:

  • The type of VM resources you need (e.g., CPUs, GPUs, disk storage).
  • The specific regions where you need these resources.
  • The duration of the quota increase, if temporary.

Step 3: Submit a Quota Increase Request

  • AWS:
  • Go to the Service Quotas dashboard.
  • Select the quota you want to increase.
  • Click on Request quota increase and provide the required details.
  • Azure:
  • Navigate to the Help + Support section.
  • Select New support request and choose the category for quota increases.
  • Google Cloud:
  • Visit the IAM & Admin > Quotas page.
  • Select the quota and region, then click Edit Quotas to create a request.

Step 4: Provide Justification (If Required)

Some cloud providers may ask for a justification for your request. Be clear and concise. Mention:

  • The purpose of the increased resources (e.g., scaling applications, testing environments).
  • Expected duration or urgency.
  • Any anticipated cost increases you are prepared for.

Step 5: Monitor the Request

  • Cloud providers typically review quota requests within 24–48 hours, though urgent requests may be expedited.
  • You can track the progress in your cloud account’s support section.

Tips for a Smooth Quota Increase Process

  • Plan Ahead: If you anticipate a spike in resource needs, request an increase early.
  • Understand Pricing: Higher quotas may lead to higher costs. Review your billing dashboard to estimate expenses.
  • Optimize Resource Usage: Before requesting an increase, check if you can optimize your current resource usage by terminating unused VMs or resizing instances.

Conclusion

Requesting an increase in your virtual machine quota is an essential skill for cloud users scaling their infrastructure. By understanding your current limits, planning your resource needs, and submitting a clear request, you can ensure seamless operations without unnecessary delays. Always monitor your usage and costs to stay in control of your cloud environment.

With these steps, you’ll be back to creating and managing virtual machines in no time!

Connect with Me:

Installing Nginx Web Server on Linux: A Step-by-Step Guide

 When it comes to setting up a powerful and efficient web server, Nginx is a popular choice due to its performance and reliability. This guide walks you through the process of installing and configuring the Nginx web server on a Linux machine. Let’s get started!

What is Nginx?

Nginx is an open-source, high-performance web server and reverse proxy server that handles concurrent connections efficiently. It’s widely used for hosting websites, load balancing, and as a reverse proxy for applications.

Step 1: Update Your System

Before installing any software, it’s always a good practice to update your system packages.

sudo apt update && sudo apt upgrade -y   # For Debian/Ubuntu-based systems
sudo yum update -y # For CentOS/RHEL-based systems

Step 2: Install Nginx

Nginx is included in the default repositories of most Linux distributions, making it easy to install.

For Debian/Ubuntu

sudo apt install nginx -y

For CentOS/RHEL

sudo yum install epel-release -y
sudo yum install nginx -y

For Fedora

sudo dnf install nginx -y

Step 3: Start and Enable Nginx Service

Once installed, you need to start the Nginx service and ensure it runs on boot.

sudo systemctl start nginx
sudo systemctl enable nginx

Check the status to confirm it’s running:

sudo systemctl status nginx

Step 4: Configure Firewall

To allow web traffic to access your server, you must open HTTP (port 80) and optionally HTTPS (port 443) in the firewall.

For UFW (Ubuntu):

sudo ufw allow 'Nginx HTTP'
sudo ufw allow 'Nginx HTTPS'
sudo ufw reload

For Firewalld (CentOS/RHEL):

sudo firewall-cmd --permanent --add-service=http
sudo firewall-cmd --permanent --add-service=https
sudo firewall-cmd --reload

Step 5: Verify Installation

Open a web browser and enter your server’s IP address. If everything is set up correctly, you should see the default Nginx welcome page.

http://<your-server-ip>

You can find your server’s IP address using:

hostname -I

Step 6: Customize Nginx Configuration

The Nginx configuration files are located in /etc/nginx/.

  • Default Configuration File: /etc/nginx/nginx.conf
  • Site Configuration Files: /etc/nginx/sites-available/ (Debian/Ubuntu)

To host your website, create a configuration file in the sites-available directory and link it to sites-enabled:

sudo nano /etc/nginx/sites-available/example.com

Add the following content:

server {
listen 80;
server_name example.com;
    root /var/www/example.com;
index index.html;
location / {
try_files $uri $uri/ =404;
}
}

Create the symbolic link:

sudo ln -s /etc/nginx/sites-available/example.com /etc/nginx/sites-enabled/

Test the configuration:

sudo nginx -t

Reload Nginx to apply changes:

sudo systemctl reload nginx

Step 7: Test Your Web Server

Create a test HTML file to ensure your configuration works.

sudo mkdir -p /var/www/example.com
sudo nano /var/www/example.com/index.html

Add the following content:

<!DOCTYPE html>
<html>
<head>
<title>Welcome to Nginx</title>
</head>
<body>
<h1>Success! Your Nginx server is working.</h1>
</body>
</html>

Save the file and visit your website in the browser:

http://<your-domain>

Troubleshooting Tips

  • Check Logs:

sudo tail -f /var/log/nginx/error.log
sudo tail -f /var/log/nginx/access.log

  • Restart Nginx:
sudo systemctl restart nginx

Conclusion

Congratulations! You’ve successfully installed and configured the Nginx web server on your Linux machine. With this setup, you’re now ready to host your websites or applications efficiently. Explore more advanced configurations like HTTPS with SSL certificates or load balancing to further enhance your server’s capabilities.

If you found this guide helpful, don’t forget to share it with others and drop your comments below! 🚀

Top ChatGPT Prompts for DevOps Engineers

  As a DevOps engineer, your role involves juggling complex tasks such as automation, infrastructure management, CI/CD pipelines, and troubl...