Wednesday, October 23, 2019
Monday, October 21, 2019
Thursday, October 17, 2019
What is Terragrunt ?
What is Terragrunt ?
Terragrunt is a thin wrapper for Terraform that provides extra tools for working with multiple Terraform modules. https://www.gruntwork.io
Terragrunt is a thin wrapper for Terraform that provides extra tools for keeping your Terraform configurations DRY, working with multiple Terraform modules, and managing remote state.
Get More details about terragrunt : https://github.com/gruntwork-io/terragrunt
Monday, October 14, 2019
Terraform - should I use user_data or remote-exec?
Terraform - should I use user_data or provisioner to bootstrap a resource?
You should use
user_data. The user data field is idiomatic because it's native to AWS, whereas the remote-exec provisioner is specific to Terraform, which is just one of many ways to call the AWS API.
Also, the user-data is viewable in the AWS console, and often an important part of using Auto Scaling Groups in AWS, where you want each EC2 Instance to execute the same config code when it launches. It's not possible to do that with Terraform's remote-exec provisioner
Thursday, October 10, 2019
Route53 to S3 Redirection
Route53 to S3 Redirection
Route53 to
S3 Redirection
Create
Hosted Zone for the domain that you want to redirect to s3
Create S3
bucket with the same name as your domain
Note: The sites must use HTTP because the redirect
can't
connect to Amazon S3 over HTTPS.
Select the bucket you just
created, and then choose
Properties. Expand the Static
Website Hosting
drop-down menu, and then choose
Redirect all
requests to another hostname.
In the
Redirect all requests to another hostname
field,
enter example.net, and then choose Save.
named
example.com.
Create a resource record for
example.com with
the following values: Record Type: Choose A –
IPv4 address. Alias: Choose Yes. Alias Target:
Select the blank value field,
expand the drop-down
menu, and then choose your S3
bucket under the
heading S3 Website Endpoints.
You should now be able to redirect your domain to s3.
You should now be able to redirect your domain to s3.
you can confirm this by adding index.html file in s3 and
check
with your DNS.
Amazon Route 53 Domain Configuration
Amazon Route 53
Domain Configuration
Configure DNS Records on Route 53
Create Hosted Zone for Public Hosting Domain as per below snaps

Domain to IP Redirection
A Record Create
-
Click Hosted Zones and select the domain you wish
to configure.
-
Click Create Record Set to add a new record, then select
A - IPv4 address for the record type.
-
Leave the Name field blank and enter the A record value
provided by Pantheon in the Value field.
-
Select Desired Time to Live (TTL
-
Click Create:
Click Hosted Zones and select the domain you wish
Click Create Record Set to add a new record, then select
Leave the Name field blank and enter the A record value
Select Desired Time to Live (TTL
Click Create:

Domain to ELB Redirection
Alias with A Records:
-
Click Create Record Set to add a new record, then select
A - IPv4 address for the record type.
-
Leave the Name field blank and enter the A record value
provided by Pantheon in the Value field.
-
Select Alias as Yes and select Load balance DNS in value
Field dropdown box
-
Click Create:
Click Create Record Set to add a new record, then select
Leave the Name field blank and enter the A record value
Select Alias as Yes and select Load balance DNS in value
Click Create:

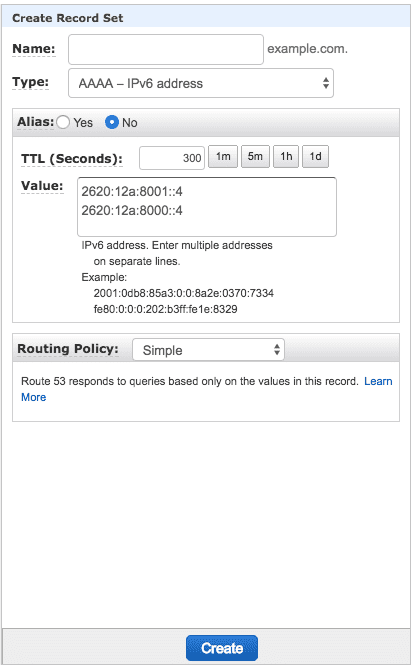
AAAA Records
-
Click Create Record Set to add a new record, then select
AAAA - IPv6 address for the record type.
-
Leave the Name field blank and enter the both AAAA records
value provided by Pantheon in the Value field.
-
Select desired TTL Value
-
Click Create:
Click Create Record Set to add a new record, then select
Leave the Name field blank and enter the both AAAA records
Select desired TTL Value
Click Create:
A Record for subdomain
An A record is required to configure a subdomain (e.g., www.example.in).
-
Click Create Record Set to add a new record, then select
A - IPv4 address for the record type.
-
Enter www in the Name field and enter the A record value
provided by Pantheon in the Value field (e.g. ip address)
-
Select desired Time to Live (TTL).
-
Click Create:
Click Create Record Set to add a new record, then select
Enter www in the Name field and enter the A record value
Select desired Time to Live (TTL).
Click Create:
AWS IAM EC2 Instance Role using Terraform
AWS IAM EC2 Instance Role using Terraform
IAM Roles are used to granting the application access
to AWS Services without using permanent credentials.
IAM Role is one of the safer ways to give permission to
your EC2 instances.
to AWS Services without using permanent credentials.
IAM Role is one of the safer ways to give permission to
your EC2 instances.
We can attach roles to an EC2 instance, and that allows us to give
permission to EC2 instance to use other AWS Services, for example,
S3 buckets, database dynamo DB, ASG
permission to EC2 instance to use other AWS Services, for example,
S3 buckets, database dynamo DB, ASG
Create an Assume role as below, assume_role_policy
— (Required) The policy that grants an entity permission
to assume the role.
— (Required) The policy that grants an entity permission
to assume the role.
This is going to create IAM role but we can’t link this role to
EC2 Instance and for that, we need EC2 instance Profile
Create EC2 Instance Profile using below code
Now if we execute the above code, we have Role and Instance
Profile but with no permission.so lets add IAM Policies which
allows EC2 instance to execute specific commands for example:
access to S3 Bucket
Adding IAM Policies,for giving full access to S3 bucket
Attach this role to EC2 instance
It’s time to execute code run
Subscribe to:
Comments (Atom)
Top ChatGPT Prompts for DevOps Engineers
As a DevOps engineer, your role involves juggling complex tasks such as automation, infrastructure management, CI/CD pipelines, and troubl...

-
sudo apt update sudo apt install ubuntu-desktop sudo apt install tightvncserver sudo apt install gnome-panel gnome-settings-daemon metac...
-
As a DevOps engineer, your role involves juggling complex tasks such as automation, infrastructure management, CI/CD pipelines, and troubl...
-
Run shell script on Your Linux Instance at Launch When you launch an instance in Amazon EC2, you have the option of passing user data ...

