Wednesday, December 30, 2020
Tuesday, December 29, 2020
Sunday, December 27, 2020
Thursday, December 24, 2020
Monday, December 21, 2020
Sunday, December 20, 2020
Friday, December 18, 2020
Thursday, December 17, 2020
#35 AWS EBS DEMO - Resizing & Changing Type, EBS Snapshot, Attach & Detach
#35 AWS EBS DEMO - Resizing & Changing Type, EBS Snapshot, Attach & Detach
Wednesday, December 16, 2020
#33 EBS Volume | Creating EBS Volume | Attach EBS Volume | Mount EBS Volume
Format and mount an attached volume
Tuesday, December 15, 2020
#32 AWS EBS Tutorial | Amazon Elastic Block Store
AWS EBS
Monday, December 14, 2020
#24 Amazon EC2 Shutdown Behaviour and Termination Protection Tutorial
EC2 Hibernate
Sunday, December 13, 2020
Thursday, December 10, 2020
Tuesday, December 8, 2020
AWS Auto Scaling Group
AWS Auto Scaling
AWS Auto Scaling Group
AWS Auto Scaling monitors your applications and automatically adjusts capacity to maintain steady, predictable performance at the lowest possible cost. Using AWS Auto Scaling, it’s easy to setup application scaling for multiple resources across multiple services in minutes.
How to Configure Auto Scaling Group
In EC2 Console go to Auto Scaling Configuration
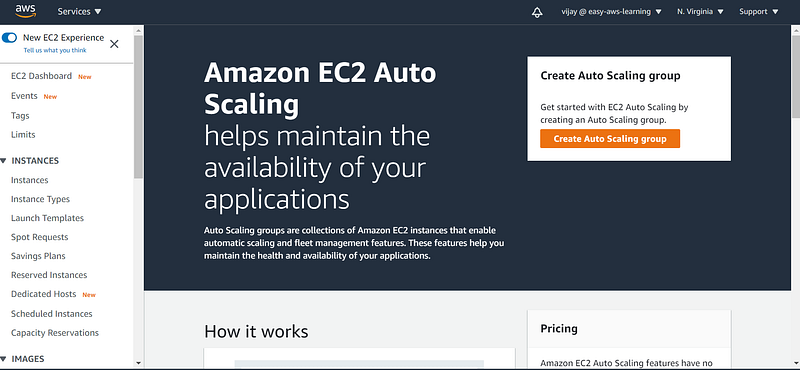
if there are no ASG configured, you will find the above flash page and to create ASG click on the create Autoscaling group button.
Auto Scaling Group having two main components to configure
- launch Configuration
- Auto Scaling Properties
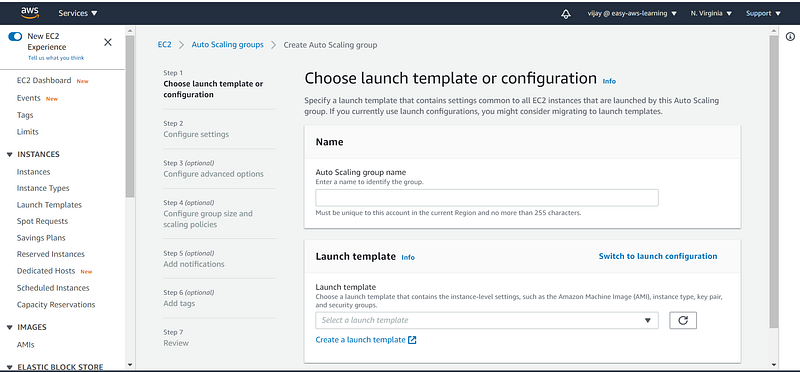
if you have not created a launch template then to create template click on create launch Template
Launch Template: Launch templates enable you to store launch parameters so that you do not have to specify them every time you launch an instance. For example, a launch template can contain the AMI ID, instance type, and network settings that you typically use to launch instances.
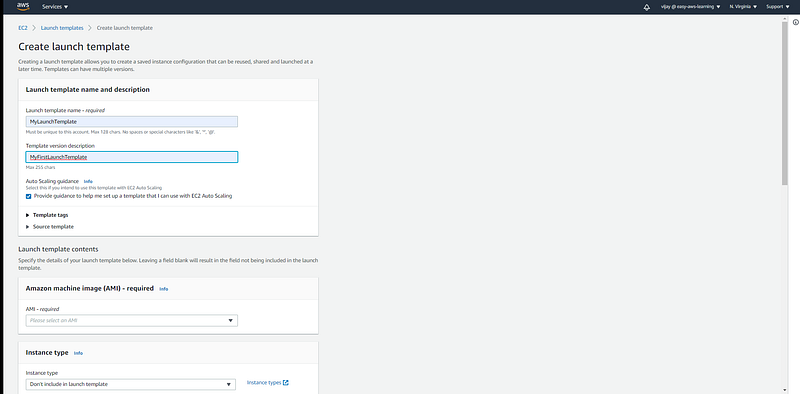
to create a launch template pass the parameters like AMI ID, Instance Type, SSH Key, Security Group, UserData.
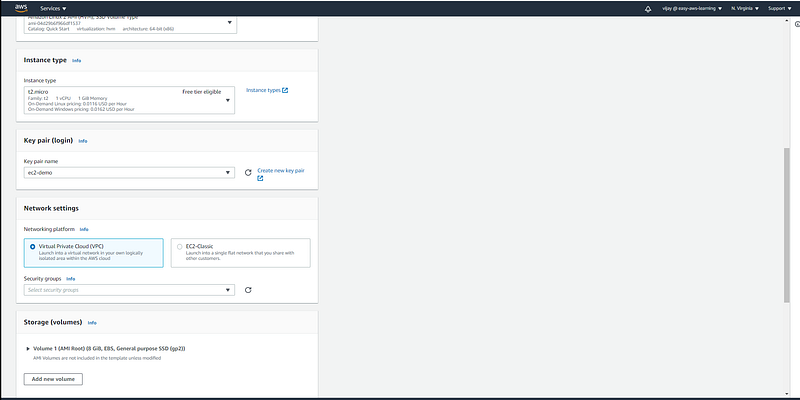
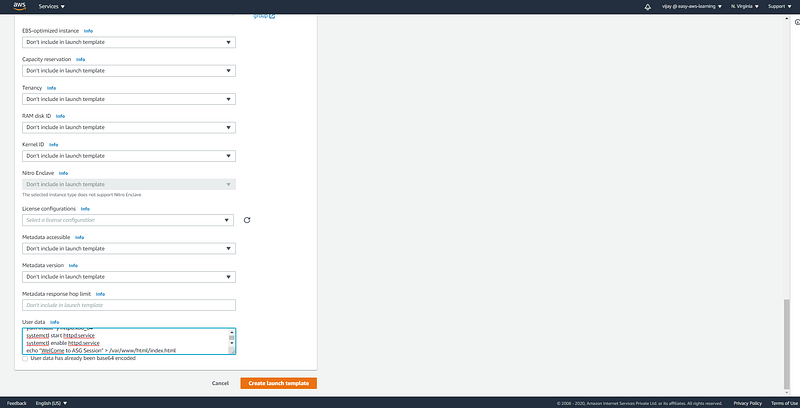
here we have added user data for HTTP server installation. (each new instance created with auto-scaling activity will take the default configuration as user-data passed through launch template)
#!/bin/bash
yum install -y httpd.x86_64
systemctl start httpd.service
systemctl enable httpd.service
echo “WelCome to AS
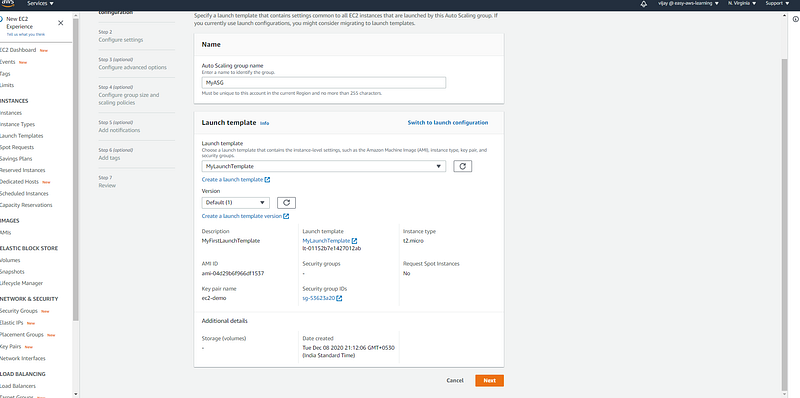
Post-launch template creation, you need to select from the drop-down button (you can see the launch template config details).
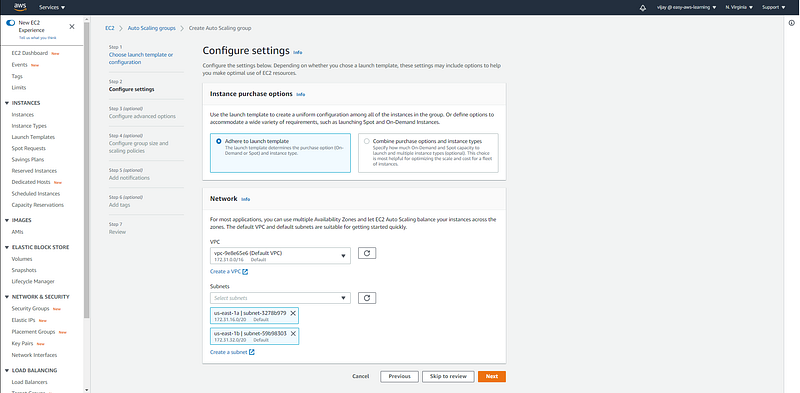
Auto Scaling Group configuration with VPC and Subnets
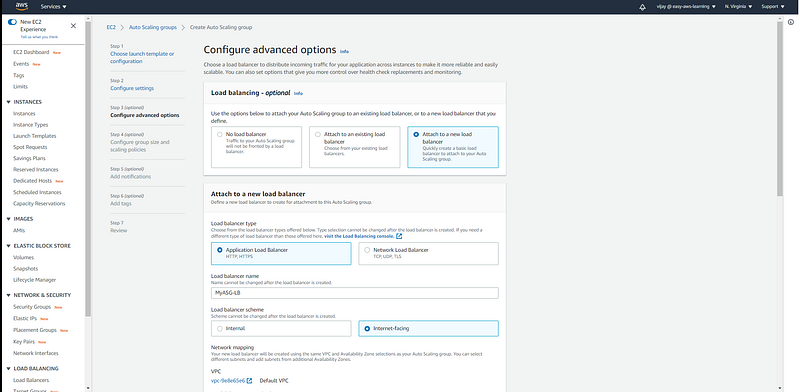
with Auto Scaling Group Configuration we can select existing Load Balancer or we can create New (of course you can choose none if you don't want to configure), here you can select LB type ALB to NLB and load balancer other properties like a load balancer scheme, VPC, Subnet.
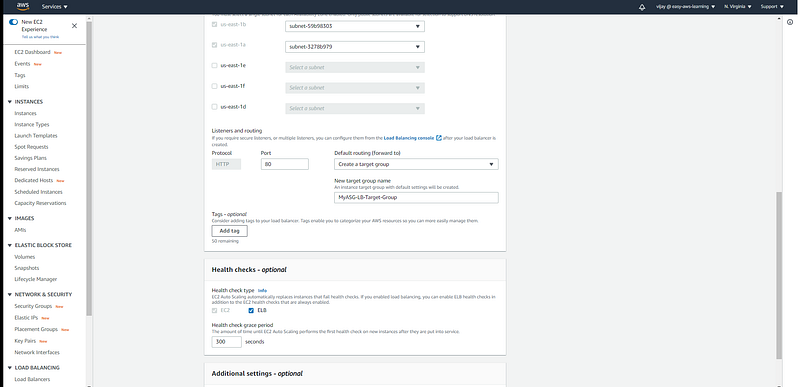
other load balancer properties like target group, health check, and cool-down period.
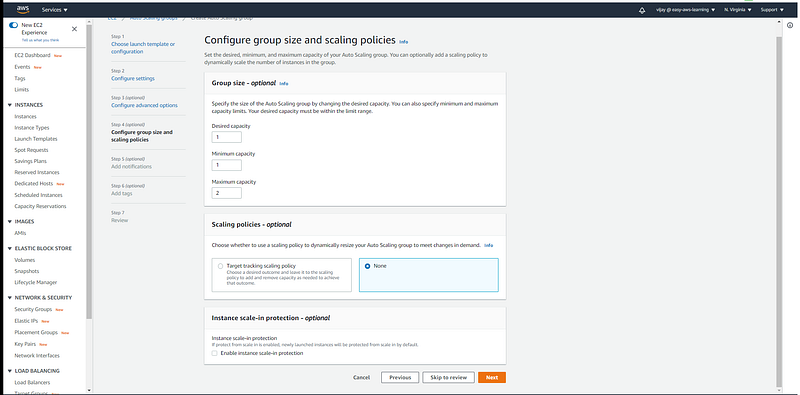
Scaling Group size and scaling policy configuration.
Minimum Capacity: This is the minimum number of instances that have to be there in your Autoscaling Group at all times. Your autoscaling group always maintains this number and never terminates instances below this number.
Maximum Capacity: This is the maximum number of instances that your autoscaling group can have. Your autoscaling will never increase the number of instances more than the specified Max number.
Desired Capacity: The desired amount represents the “current amount” of instances in your autoscaling group. An autoscaling group will start by launching as many instances as specified as the desired capacity. When scaling policies are set, the desired capacity is adjusted between the minimum and maximum amount.
Desired capacity should be set greater than or equal to the min value and less than or equal to the max value.
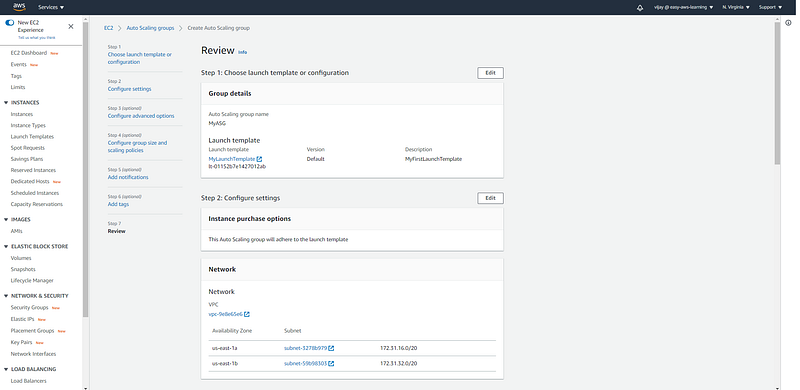
Review All configuration for ASG.

Auto Scaling Group Created.
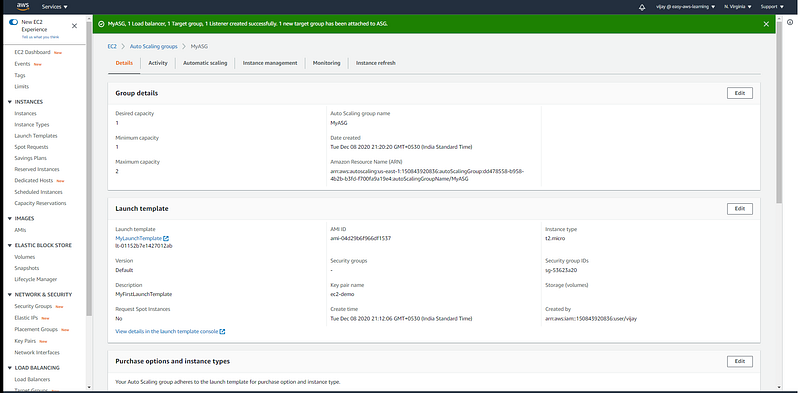
Auto Scaling Group Configuration review, Edit, or delete can be done from here.
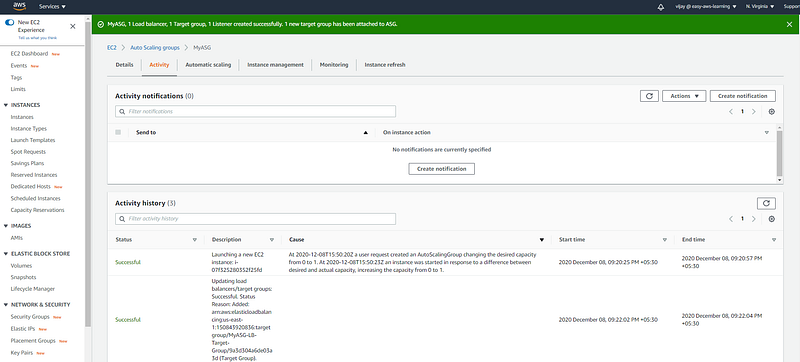
On the Activity tab, under Activity history, the Status column shows whether your Auto Scaling group has successfully launched or terminated instances. here you can see the new instance launched.
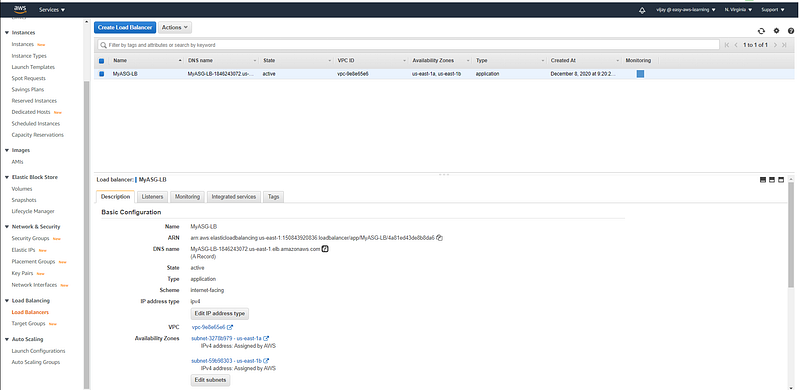
Load Balancer created with ASG (review configuration)

Access DNS to access HTTP server configured in ASG launch Template
Auto Scaling Policy

Add Scaling Policy from Automatic Scaling Tab.
Scaling policy types
Amazon EC2 Auto Scaling supports the following types of scaling policies:
- Target tracking scaling — Increase or decrease the current capacity of the group based on a target value for a specific metric. This is similar to the way that your thermostat maintains the temperature of your home — you select a temperature and the thermostat does the rest.
- Step scaling — Increase or decrease the current capacity of the group based on a set of scaling adjustments, known as step adjustments, that vary based on the size of the alarm breach.
- Simple scaling — Increase or decrease the current capacity of the group based on a single scaling adjustment.
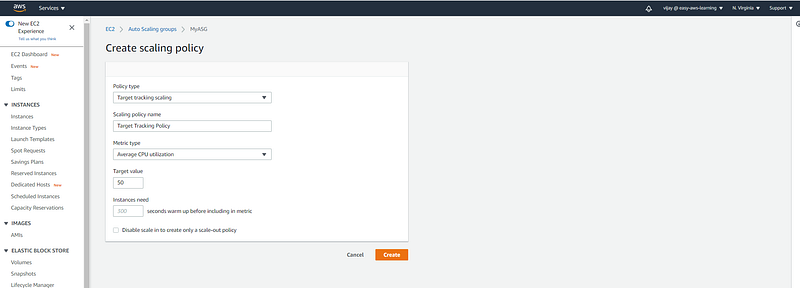
Creating Target Tracking Policy here with metric type is the CPU utilization of 50%
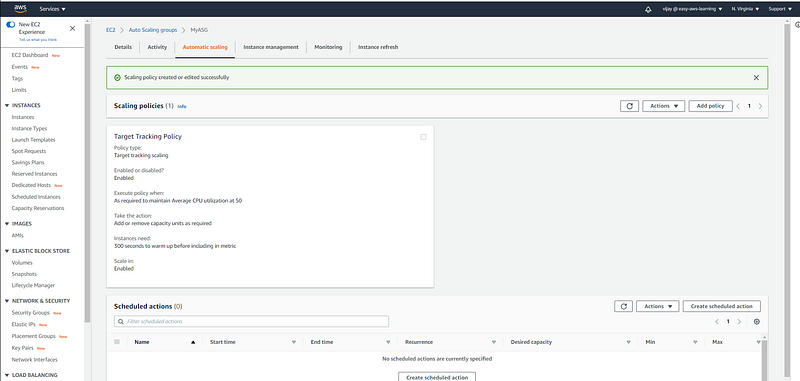
Policy Review, from this page user, can delete exit policy

Cloud Watch Alarm will be created with Target Tracking Policy.
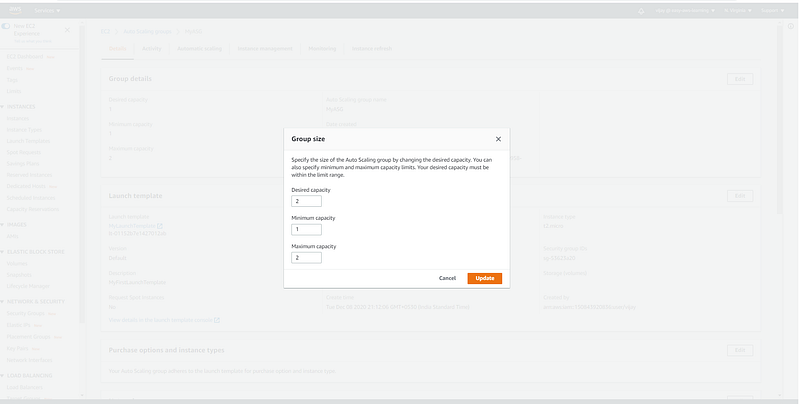
Updating Desired Capacity to test Target Tracking Policy.

Updated Desired Capacity, this will add new Instance in Activity, you can see the new instance added so now there are 2 instance should be running.
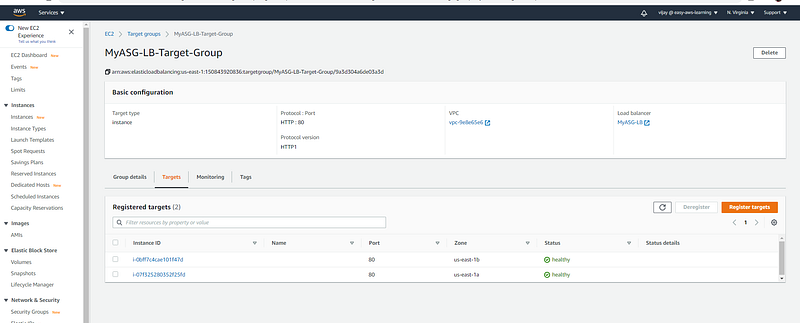
New Instance added and it's running

Cloud Watch Alarm triggered with continuous CPU utilization down with threshold.
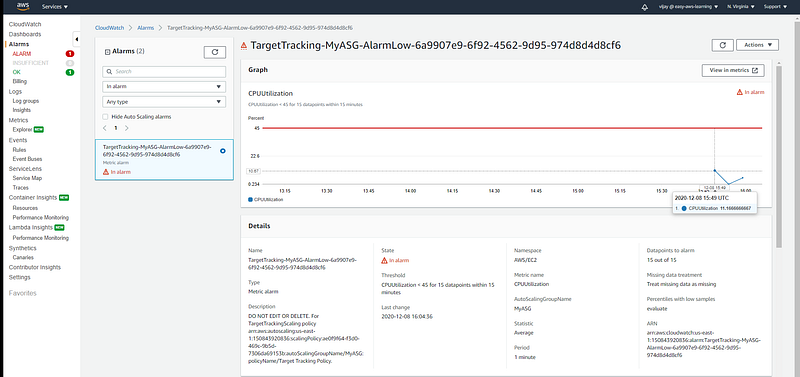
CPU Utilization of Instance.
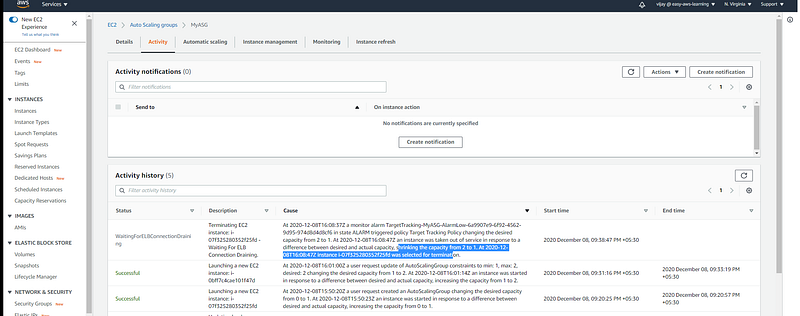
with Policy Trigged instance removed the same you can see in activity
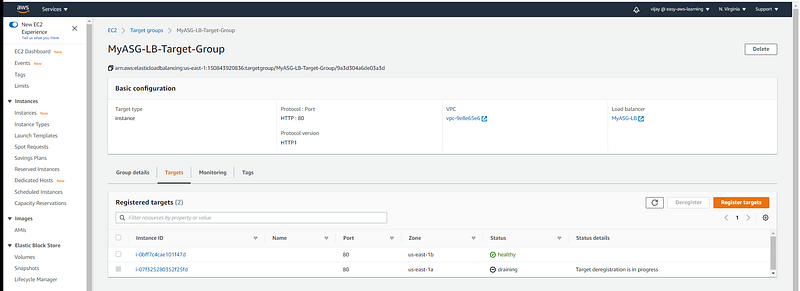
Validate Instance drained
This is the complete guild for how to configure Auto Scaling Group with LB & Policy
Monday, December 7, 2020
Friday, December 4, 2020
Thursday, December 3, 2020
Wednesday, December 2, 2020
Signature Verification using OpenSSL
generate RSA Private Key
#openssl genrsa -out private.pem 2048
Generate RSA public Key from Private Key
#openssl rsa -in private.pem -outform PEM -pubout -out public.pem
Sing Operation using RSA Private Key
#openssl sha1 -sign private.pem test > sig.bin
Verify Operation using RSA Public Key
#openssl sha1 -verify public.pem -signature sig.bin test
OpenSSL ECDSA sign and verify file
EC Key generation with Specific Curves
openssl ecparam -genkey -name brainpoolP512r1 -noout -out private.pem
EC Public Key Generation
openssl ec -in private.pem -pubout -out public.pem
Sign Verify:
openssl dgst -sha1 -sign private.pem test > signature.bin
openssl dgst -sha1 -verify public.pem -signature signature.bin test
Openssl ecparam list_curves , openssl list ec curves
openssl ecparam -list_curves
[root@hyd1688 ec_sign_verify]# openssl ecparam -list_curves
secp112r1 : SECG/WTLS curve over a 112 bit prime field
secp112r2 : SECG curve over a 112 bit prime field
secp128r1 : SECG curve over a 128 bit prime field
secp128r2 : SECG curve over a 128 bit prime field
secp160k1 : SECG curve over a 160 bit prime field
secp160r1 : SECG curve over a 160 bit prime field
secp160r2 : SECG/WTLS curve over a 160 bit prime field
secp192k1 : SECG curve over a 192 bit prime field
secp224k1 : SECG curve over a 224 bit prime field
secp224r1 : NIST/SECG curve over a 224 bit prime field
secp256k1 : SECG curve over a 256 bit prime field
secp384r1 : NIST/SECG curve over a 384 bit prime field
secp521r1 : NIST/SECG curve over a 521 bit prime field
prime192v1: NIST/X9.62/SECG curve over a 192 bit prime field
prime192v2: X9.62 curve over a 192 bit prime field
prime192v3: X9.62 curve over a 192 bit prime field
prime239v1: X9.62 curve over a 239 bit prime field
prime239v2: X9.62 curve over a 239 bit prime field
prime239v3: X9.62 curve over a 239 bit prime field
prime256v1: X9.62/SECG curve over a 256 bit prime field
sect113r1 : SECG curve over a 113 bit binary field
sect113r2 : SECG curve over a 113 bit binary field
sect131r1 : SECG/WTLS curve over a 131 bit binary field
sect131r2 : SECG curve over a 131 bit binary field
sect163k1 : NIST/SECG/WTLS curve over a 163 bit binary field
sect163r1 : SECG curve over a 163 bit binary field
sect163r2 : NIST/SECG curve over a 163 bit binary field
sect193r1 : SECG curve over a 193 bit binary field
sect193r2 : SECG curve over a 193 bit binary field
sect233k1 : NIST/SECG/WTLS curve over a 233 bit binary field
sect233r1 : NIST/SECG/WTLS curve over a 233 bit binary field
sect239k1 : SECG curve over a 239 bit binary field
sect283k1 : NIST/SECG curve over a 283 bit binary field
sect283r1 : NIST/SECG curve over a 283 bit binary field
sect409k1 : NIST/SECG curve over a 409 bit binary field
sect409r1 : NIST/SECG curve over a 409 bit binary field
sect571k1 : NIST/SECG curve over a 571 bit binary field
sect571r1 : NIST/SECG curve over a 571 bit binary field
c2pnb163v1: X9.62 curve over a 163 bit binary field
c2pnb163v2: X9.62 curve over a 163 bit binary field
c2pnb163v3: X9.62 curve over a 163 bit binary field
c2pnb176v1: X9.62 curve over a 176 bit binary field
c2tnb191v1: X9.62 curve over a 191 bit binary field
c2tnb191v2: X9.62 curve over a 191 bit binary field
c2tnb191v3: X9.62 curve over a 191 bit binary field
c2pnb208w1: X9.62 curve over a 208 bit binary field
c2tnb239v1: X9.62 curve over a 239 bit binary field
c2tnb239v2: X9.62 curve over a 239 bit binary field
c2tnb239v3: X9.62 curve over a 239 bit binary field
c2pnb272w1: X9.62 curve over a 272 bit binary field
c2pnb304w1: X9.62 curve over a 304 bit binary field
c2tnb359v1: X9.62 curve over a 359 bit binary field
c2pnb368w1: X9.62 curve over a 368 bit binary field
c2tnb431r1: X9.62 curve over a 431 bit binary field
wap-wsg-idm-ecid-wtls1: WTLS curve over a 113 bit binary field
wap-wsg-idm-ecid-wtls3: NIST/SECG/WTLS curve over a 163 bit binary field
wap-wsg-idm-ecid-wtls4: SECG curve over a 113 bit binary field
wap-wsg-idm-ecid-wtls5: X9.62 curve over a 163 bit binary field
wap-wsg-idm-ecid-wtls6: SECG/WTLS curve over a 112 bit prime field
wap-wsg-idm-ecid-wtls7: SECG/WTLS curve over a 160 bit prime field
wap-wsg-idm-ecid-wtls8: WTLS curve over a 112 bit prime field
wap-wsg-idm-ecid-wtls9: WTLS curve over a 160 bit prime field
wap-wsg-idm-ecid-wtls10: NIST/SECG/WTLS curve over a 233 bit binary field
wap-wsg-idm-ecid-wtls11: NIST/SECG/WTLS curve over a 233 bit binary field
wap-wsg-idm-ecid-wtls12: WTLS curve over a 224 bit prime field
Oakley-EC2N-3:
IPSec/IKE/Oakley curve #3 over a 155 bit binary field.
Not suitable for ECDSA.
Questionable extension field!
Oakley-EC2N-4:
IPSec/IKE/Oakley curve #4 over a 185 bit binary field.
Not suitable for ECDSA.
Questionable extension field!
brainpoolP160r1: RFC 5639 curve over a 160 bit prime field
brainpoolP160t1: RFC 5639 curve over a 160 bit prime field
brainpoolP192r1: RFC 5639 curve over a 192 bit prime field
brainpoolP192t1: RFC 5639 curve over a 192 bit prime field
brainpoolP224r1: RFC 5639 curve over a 224 bit prime field
brainpoolP224t1: RFC 5639 curve over a 224 bit prime field
brainpoolP256r1: RFC 5639 curve over a 256 bit prime field
brainpoolP256t1: RFC 5639 curve over a 256 bit prime field
brainpoolP320r1: RFC 5639 curve over a 320 bit prime field
brainpoolP320t1: RFC 5639 curve over a 320 bit prime field
brainpoolP384r1: RFC 5639 curve over a 384 bit prime field
brainpoolP384t1: RFC 5639 curve over a 384 bit prime field
brainpoolP512r1: RFC 5639 curve over a 512 bit prime field
brainpoolP512t1: RFC 5639 curve over a 512 bit prime field
SM2 : SM2 curve over a 256 bit prime field
Tuesday, December 1, 2020
Monday, November 23, 2020
Sunday, November 22, 2020
Friday, November 20, 2020
Thursday, November 19, 2020
Wednesday, November 18, 2020
Tuesday, November 17, 2020
Monday, November 16, 2020
Tuesday, October 27, 2020
Thursday, October 15, 2020
Monday, October 5, 2020
Wednesday, September 23, 2020
Tuesday, September 22, 2020
# 17 AWS Essentials: Amazon Machine Images (AMIs) Demo | AWS In Hindi
Amazon Machine Image (AMI) एक उदाहरण लॉन्च करने के लिए आवश्यक जानकारी प्रदान करता है। ... ऐसी अनुमतियाँ लॉन्च करें, जो AWS खातों को नियंत्रित करने के लिए AWS खातों का उपयोग कर सकती हैं। ब्लॉक डिवाइस मैपिंग जो कि लॉन्च होने पर उदाहरण के लिए वॉल्यूम को निर्दिष्ट करती है।
Reference: https://docs.aws.amazon.com/AWSEC2/latest/UserGuide/AMIs.html
Monday, September 21, 2020
Docker in HiNDI | Docker क्या है
What is Docker? Easy Way | In Hindi | Docker क्या है

Docker एक उपकरण है जिसे Container का उपयोग करके एप्लिकेशन बनाना, तैनात करना और चलाना आसान बनाना है। कंटेनरों को एक डेवलपर को उन सभी भागों के साथ एक एप्लिकेशन को पैकेज करने की अनुमति देता है, जैसे कि पुस्तकालय और अन्य निर्भरताएं, और इसे एक पैकेज पर तैनात करता है। ऐसा करने से, कंटेनर के लिए धन्यवाद, डेवलपर यह आश्वासन दे सकता है कि एप्लिकेशन किसी भी अन्य अनुकूलित सेटिंग्स की परवाह किए बिना किसी भी अन्य Linux मशीन पर चलेगा जो कि मशीन हो सकती है जो कोड लिखने और परीक्षण करने के लिए उपयोग की जाने वाली मशीन से भिन्न हो सकती है।Docker कंटेनर पर आधारित अनुप्रयोगों के निर्माण के लिए एक सॉफ्टवेयर प्लेटफॉर्म है - छोटे और हल्के निष्पादन वाले वातावरण जो ऑपरेटिंग सिस्टम कर्नेल का साझा उपयोग करते हैं, लेकिन अन्यथा एक दूसरे से अलगाव में चलते हैं। जबकि एक अवधारणा के रूप में कंटेनर कुछ समय के लिए आसपास रहे हैं, 2013 में लॉन्च किए गए एक ओपन-सोर्स प्रोजेक्ट, डॉकर ने प्रौद्योगिकी को लोकप्रिय बनाने में मदद की है और सॉफ्टवेयर विकास में कंटेनराइजेशन और माइक्रोसर्विस की ओर रुझान बढ़ाने में मदद की है जिसे क्लाउड-देशी के रूप में जाना जाता है।
Sunday, September 20, 2020
What is Docker? Easy way
What is Docker?

Docker is a tool designed to make it easier to create, deploy, and run applications by using containers. Containers allow a developer to package up an application with all of the parts it needs, such as libraries and other dependencies, and deploy it as one package. By doing so, thanks to the container, the developer can rest assured that the application will run on any other Linux machine regardless of any customized settings that machine might have that could differ from the machine used for writing and testing the code.
Docker is a software platform for building applications based on containers — small and lightweight execution environments that make shared use of the operating system kernel but otherwise run in isolation from one another. While containers as a concept have been around for some time, Docker, an open-source project launched in 2013, helped popularize the technology and has helped drive the trend towards containerization and microservices in software development that has come to be known as cloud-native development.
Sunday, September 13, 2020
Monday, August 31, 2020
Monday, August 17, 2020
Monday, August 10, 2020
Tuesday, August 4, 2020
Monday, August 3, 2020
Friday, July 31, 2020
Friday, July 24, 2020
Thursday, July 23, 2020
How to set Jenkins user as root
1. Open up the script
vim /etc/sysconfig/jenkins$JENKINS_USER and change to “root”:$JENKINS_USER="root"chown -R root:root /var/lib/jenkins
chown -R root:root /var/cache/jenkins
chown -R root:root /var/log/jenkinsservice jenkins restart
Friday, July 17, 2020
Wednesday, July 15, 2020
Saturday, July 11, 2020
Create a New Sudo User in AWS EC2 (Ubuntu AMI)
Create a New Sudo User in AWS EC2
(Ubuntu AMI)
ssh ec2-user@<ip> -i <ssh key>
|
ubuntu@ip-172-31-24-53:~$ sudo -i
root@ip-172-31-24-53:~# |
adduser <username>
root@ip-172-31-24-53:~# adduser test
|
strong password to secure account
root@ip-172-31-24-53:~# passwd test
Enter new UNIX password: Retype new UNIX password: passwd: password updated successfully |
Use the usermod command to add the user to the sudo group.
usermod -aG sudo username
root@ip-172-31-24-53:~# usermod -aG sudo test
|
root@ip-172-31-24-53:~# su test
su - username
|
that you want to run with superuser privileges.
test@ip-172-31-24-53:/root$ sudo ls -la /root
|
Thursday, July 9, 2020
Installing JFrog Artifactory on CentOS / RHEL 7
Installing JFrog Artifactory on CentOS / RHEL 7
Artifactory is a universal repository manager created by JFrog.
A repository manager is a software application designed to manage binary
components related to an application. Being a universal repository manager,
Artifactory supports all major packaging formats like Apache Maven, Gradle,
Docker and many more.
# Upgrade to Java-8 sudo yum install java-1.8.0 sudo yum remove java-1.7.0-openjdk
#Setting up JAVA_HOME Environment Variable
echo "export /
JAVA_HOME=/usr/lib/jvm/java-1.8.0-openjdk-1.8.0.191.b12-1.el7_6.x86_64"/ >> /etc/profile
. /etc/profile
env | grep JAVA
JAVA_HOME=/usr/lib/jvm/java-1.8.0-openjdk-1.8.0.191.b12-1.el7_6.x86_64
# Installing Artifactory wget https://bintray.com/jfrog/artifactory-rpms/rpm -O / bintray-jfrog-artifactory-rpms.repo sudo mv bintray-jfrog-artifactory-rpms.repo /etc/yum.repos.d/ sudo yum install jfrog-artifactory-oss
echo "export ARTIFACTORY_HOME=/opt/jfrog/artifactory" >> /etc/profile
. /etc/profile
env | grep ARTIFACTORY_HOME
ARTIFACTORY_HOME=/opt/jfrog/artifactory
# Setup Service sudo service artifactory start |
Monday, July 6, 2020
Thursday, July 2, 2020
Wednesday, July 1, 2020
Monday, June 29, 2020
Friday, June 26, 2020
Thursday, June 25, 2020
Tuesday, June 23, 2020
Top ChatGPT Prompts for DevOps Engineers
As a DevOps engineer, your role involves juggling complex tasks such as automation, infrastructure management, CI/CD pipelines, and troubl...

-
sudo apt update sudo apt install ubuntu-desktop sudo apt install tightvncserver sudo apt install gnome-panel gnome-settings-daemon metac...
-
As a DevOps engineer, your role involves juggling complex tasks such as automation, infrastructure management, CI/CD pipelines, and troubl...
-
Run shell script on Your Linux Instance at Launch When you launch an instance in Amazon EC2, you have the option of passing user data ...