Step 1:Launch the basic EC2 instance with 8080 port enable in the security group.
Step 2:Update the software package of the instance using the below command:
sudo su
sudo yum update -y
Step 3:Install java packages and remove the oldest version of java if any:
sudo yum install java-1.8.0sudo yum remove java-1.7.0-openjdk
Step 4:Add the Jenkins repo
sudo wget -O /etc/yum.repos.d/jenkins.repo \
    https://pkg.jenkins.io/redhat-stable/jenkins.repo
Step 5:Import the key file:
sudo rpm --import https://pkg.jenkins.io/redhat-stable/jenkins.io.keysudo yum upgrade
Step 6:Install Jenkins using the below command:
sudo yum install jenkins -yStep 7:Enable the Jenkins service to start at boot:
sudo systemctl enable jenkinsStart Jenkins as a service:
sudo systemctl start jenkinsYou can check the status of the Jenkins service using the command:
sudo systemctl status jenkinsStep 8: Open the browser and hit the public IP along with the 8080 port.

Step 9: Copy the path and get the password from the server:
sudo cat /var/lib/jenkins/secrets/initialAdminPassword
Step 10: Install the suggested plugins :

Step 11: Add the user credentials and save it:

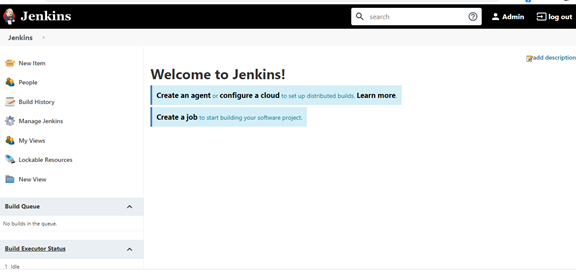
Step 12: Installation and configuration are completed and now you can start creating the Jenkins jobs.
So I hope this was very helpful and if you have any doubts or any questions you can write them down in the comment section below and I will try to answer you as soon as I can.
▬▬▬▬▬▬ Connect with me ▬▬▬▬▬▬
Youtube Subscription ► https://bit.ly/2LENtS1
Facebook Page: ► https://www.facebook.com/EasyAWSLearn/
Medium: ► https://techworldwithvijaypatel.mediu...
Dev: ► https://dev.to/easyawslearn
Telegram Channel: ► https://t.me/devtul
Thank you.


No comments:
Post a Comment